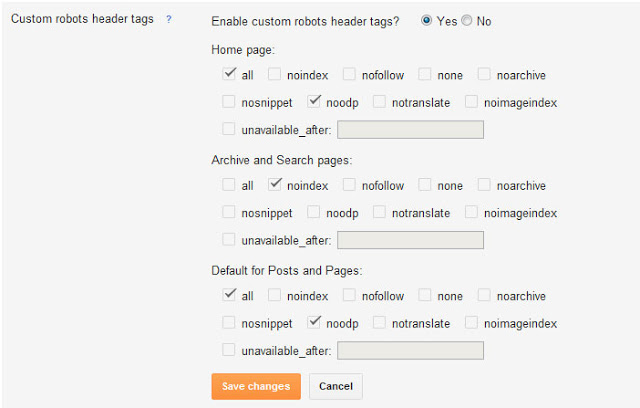
Sanjay Choubey

  • Home
  • Services
    • SEO
    • PPC
    • SMO
    • SEO Niche
      • Education SEO
      • Dental SEO
  • SEO Packages
  • About
  • Blog
  • Results
  • Reviews
  • Contact

recent comment box Widget for blogger

July 16, 2013 By Sanjay Choubey 10 Comments

Add a floating recent comment box in your Blogspot/wordpress blog

Adding a floating style recent comments box will not only increase your Blog’s beauty but also it helps you to be in better touch with your blog viewers.
You can add it in any section of your Blog. so don’t wait to add this awesome look Blogger widget.
Also read : How to add cute flying twitter bird in Blogger
Floating comment box in Blogger
Recent comment box widget in Blogger
 How to add this widget :
  • Go to Blogger Dashboard
  • Select the blog and click on the layout
  • Add a html/javascript widget
  • Paste the following code and then after click on save.
<style type=”text/css”>

ul.bh_recent_comments {
    list-style: none;
    margin: 0;
    padding: 0;
}
.bh_recent_comments li {
    background: none!important;
    margin: 5px!important;
    padding: 5px!important;
    display: block;
    clear: both;
    overflow: hidden;
    list-style: none;
}
.bh_recent_comments li .avatarImage {
    padding: 3px;
    background: #fefefe;
    -webkit-box-shadow: 0 1px 1px #ccc;
    -moz-box-shadow: 0 1px 1px #ccc;
    box-shadow: 0 1px 1px #ccc;
    float: left;
    margin: 0 6px 0 0;
    position: relative;
    overflow: hidden;
}
.avatarRound {
    -webkit-border-radius: 100px;
    -moz-border-radius: 100px;
    border-radius: 100px;
}
.bh_recent_comments li img {
    padding: 0;
    position: relative;
    overflow: hidden;
    display: block;
}
.bh_recent_comments li span {
    margin-top: 3px;
    color: #666;
    display: block;
    font-size: 12px;
    line-height: 1.4;
}
.bh_recent_comments li {
    -webkit-transition: .5s;
    -moz-transition: .5s;
    -ms-transition: .5s;
    -o-transition: .5s;
    transition: .5s;
    border: 2px solid transparent;
}
.bh_recent_comments li:hover {
    border: 2px Solid #1BA1E2;
}
</style>
<script type=”text/javascript”>
//<![CDATA[
    // Recent Comments Settings
    var
 numComments  = 5,
 showAvatar  = true,
 avatarSize  = 45,
 roundAvatar = true,
 characters  = 40,
 showMorelink = false,
 moreLinktext = “More ?”,
 defaultAvatar  = “http://3.bp.blogspot.com/-HseCrBm2t_E/URitaAUacjI/AAAAAAAAC0c/Uw4FO3CLyyE/s1600/blogger-avatar-1.png”,
 hideCredits = true;
//]]>
</script>
<script type=”text/javascript” src=”http://dl.dropbox.com/u/81212926/bloggerheroe-recent%3Dcomments.js”></script>

<script type=”text/javascript” src=”/feeds/comments/default?alt=json&callback=bh_recent_comments&max-results=5″></script>

How to customize : You can change the default avatar address by changing the address 
http://3.bp.blogspot.com/-HseCrBm2t_E/URitaAUacjI/AAAAAAAAC0c/Uw4FO3CLyyE/s1600/blogger-avatar-1.png

Change the digit from numComments  = 5, as you want the number of recent comments to show.
Know how to add this is as a wordpress widget
If you have any issue. Let me know in the comment section. 

Filed Under: Blogger gadgets, Blogger tips, Blogger widgets, wordpress tips

How to create and submit Blogger sitemap in Google webmaster tools

July 9, 2013 By Sanjay Choubey 1 Comment

Its very important to submit sitemap to Google if you need a heavy traffic to your Blog. So you should submit it but remember one thing always submit it if you have written some good number of posts for your website. Its very important for the Blogger since it helps Google to easily crawl and index your website.

Its an  important tips for Blogger  because after submission of Blogger sitemap his/her website will indexed properly by Google.

It will help you to get the organic traffic from the web. because your posts will be indexed by Google and will start improving its position in the search result.

How to submit Blogger sitemap to Google

All you need is to follow these simple steps :
 
  • Go to Google webmaster tools and give your gmail id and password for sign in
  • Now you will see list of Blogspot Blogs you own click on the blog (Blog title ) for which you want to submit Blogger sitemap
  • Now click on the sitemap button as you see on the right side as shown in below figure
Create ans submit Blogger sitemap to Google
  • you will see an option of add/test sitemap on the top right side. Click on that
add/test Blogger sitemap to google
  • Now add the below code and click on submit sitemap. if you have blogger posts less than 500.

atom.xml?redirect=false&start-index=1&max-results=500

  •  Done…!! you have successfully submitted Blogger sitemap to Google.

Please Read – If your Blog contains more than 500 posts then  you need to add below code and then press    Submit sitemap

atom.xml?redirect=false&start-index=500&max-results=1000

If you are facing any issue kindly let me know in the comment section.

Filed Under: Blogger tips, SEO Tagged With: create blogger sitemap, submit blogger sitemap to blogger

Easy steps to optimize Images in Blogger post for seo point of view

July 6, 2013 By Sanjay Choubey 9 Comments

Optimize your all images in Blogger blog to improve visibility in Google image search result and get a huge traffic  from  there. We know people also search for the images so you need to do focus on it so that your images can appear in the search result. I know you often search for images in Google some times you feel  why your images has not seen in Google or other search engine search result. These all happened due to some mistakes in your blogspot blog. All you need is to do some seo while placing your images in the Blogger post.It is quite easy you need to follow these simple steps:

Steps to do before/while uploading an Image.

Read : How to add open graph meta tag in Blogger
 
  •  Always rename the image according to the  title: 

 One should  must rename the images when ever you download from the internet .You should give the image name according to the title of the page. When you are renaming an Image I will recommend you to give hyphen(-) between the keyword words. Like Optimize-Blogger-images

  •   Place alt tag in images:

it can be done when you upload an image, just click on the image after uploading you will see  property option on the top just click on it and change the alt tag and title text.

How to seo optimize Blogger images
Add title and test tag in Blogger for optimizuing images
 

  •   Put Captions in The images :
When you upload an image in Blogger post sinle click on it you will see an option for writinh captions, Must add a caption it helps google bot to easily read your images title.
  • Always Upload light weight images :
 Don’t upload any image from the internet by default. you should compress it so that it will not effect your blog loading time. you can compress images from picasa, Ms office picture manager, or from Adobe photoshop. You can do it it Adobe photoshop by clicking on save for web option from the Menu or simply press ctrl+alt+shift+s
If you have any issue, don’t forget to ask it in comment section…..!!!!

Filed Under: Blogger tips, SEO Tagged With: optimize Blogger Images

Add a stylish colorful Search box widget in Blogger

July 4, 2013 By Sanjay Choubey 6 Comments

Search box Gadget is much needed for Bloggers as Readers can directly  search there queries. Although Blogger provides Search box widget  by default. But majority of Bloggers don’t add that widget since it is not an attractive widget. We need a list of stylish and colorful widget so that it can suit in our Blogger template.

M providing some good looking search box widget in almost every color. you just need to choose any one gadget from your choice.
Also read : How to add Blogger official Contact Form

Benefits to add a Search box in Blogger Blog:

Although it is useful for readers . they can search a particular post from hunderds of your posts in quick time. n also it is useful for Bloggers since they can quickly search there posts and can use it when they need.
How to add these Beautiful search box :

  • Go to Blogger and select your Blog
  • Click on layout
  • select add a gadget
  • Click on add a html/javascript
  • Selct any Blogger search box code from the list and paste on it
  • After pasting any of the below code, Click on save.
Blogger red and white Search box 
<style type="text/css">
#w2b-searchbox{background:url(https://lh4.googleusercontent.com/-Pd1zyUMhsVo/TeixHnaB1hI/AAAAAAAAA6M/p-Iz_WGMQ3M/way2blogging_searchbox4.png) no-repeat scroll center center transparent;width:307px;height:50px;disaply:block;}
form#w2b-searchform{display: block;padding: 12px;margin:0;}
form#w2b-searchform #s{padding: 6px 6px 6px 26px;margin:0;width: 215px;font-size:14px;vertical-align: top;border:none;background:transparent;}
form#w2b-searchform #sbutton{margin:0;padding:0;height:30px;width:30px;vertical-align: top;border:none;background:transparent;}
</style>   
<div id="w2b-searchbox">
<form id="w2b-searchform" action="/search" method="get">
    <input type="text" id="s" name="q" value=""/>
    <input type="image" src="https://img1.blogblog.com/img/blank.gif" id="sbutton" />
</form>
</div>
Blogger Red color Search box
<style type="text/css">
#w2b-searchbox{background:url(https://lh3.googleusercontent.com/-peHEeRB58M8/TeixHZml3oI/AAAAAAAAA6E/J2_zg9Fn8PI/way2blogging_searchbox3.png) no-repeat scroll center center transparent;width:307px;height:50px;disaply:block;}
form#w2b-searchform{display: block;padding: 10px 12px;margin:0;}
form#w2b-searchform #s{padding: 6px;margin:0;width: 235px;font-size:14px;vertical-align: top;border:none;background:transparent;}
form#w2b-searchform #sbutton{margin:0;padding:0;height:30px;width:30px;vertical-align: top;border:none;background:transparent;}
</style>   
<div id="w2b-searchbox">
<form id="w2b-searchform" action="/search" method="get">
    <input type="text" id="s" name="q" value="Search..." onfocus='if (this.value == "Search...") {this.value = ""}' onblur='if (this.value == "") {this.value = "Search...";}'/>
    <input type="image" src="https://img1.blogblog.com/img/blank.gif" id="sbutton" />
</form>
</div>
Black color Blogger search box 
<style type="text/css">
#w2b-searchbox{background:url(https://lh5.googleusercontent.com/-Cm6Ya53Wj6g/TeixHY3LRDI/AAAAAAAAA6I/jJkMnJEN60s/way2blogging_searchbox1.png) no-repeat scroll center center transparent;width:307px;height:50px;disaply:block;}
form#w2b-searchform{display: block;padding: 10px 12px;margin:0;}
form#w2b-searchform #s{padding: 6px;margin:0;width: 235px;font-size:14px;vertical-align: top;border:none;background:transparent;}
form#w2b-searchform #sbutton{margin:0;padding:0;height:30px;width:30px;vertical-align: top;border:none;background:transparent;}
</style>   
<div id="w2b-searchbox">
<form id="w2b-searchform" action="/search" method="get">
    <input type="text" id="s" name="q" value="Search..." onfocus='if (this.value == "Search...") {this.value = ""}' onblur='if (this.value == "") {this.value = "Search...";}'/>
    <input type="image" src="https://img1.blogblog.com/img/blank.gif" id="sbutton" />
</form>
</div>
Yellow color Blogger search box
<style type="text/css">
#w2b-searchbox{background:url(https://lh3.googleusercontent.com/-bk2Si48eZSo/TeixHMdeiII/AAAAAAAAA6A/eQEEa1tyZkI/way2blogging_searchbox2.png) no-repeat scroll center center transparent;width:307px;height:50px;disaply:block;}
form#w2b-searchform{display: block;padding: 10px 12px;margin:0;}
form#w2b-searchform #s{padding: 6px;margin:0;width: 235px;font-size:14px;vertical-align: top;border:none;background:transparent;}
form#w2b-searchform #sbutton{margin:0;padding:0;height:30px;width:30px;vertical-align: top;border:none;background:transparent;}
</style>   
<div id="w2b-searchbox">
<form id="w2b-searchform" action="/search" method="get">
    <input type="text" id="s" name="q" value="Search..." onfocus='if (this.value == "Search...") {this.value = ""}' onblur='if (this.value == "") {this.value = "Search...";}'/>
    <input type="image" src="https://img1.blogblog.com/img/blank.gif" id="sbutton" />
</form>
</div>
Blue color stylish Blogger search box
<style type="text/css">
#w2b-searchbox{background:url(https://lh5.googleusercontent.com/-TN5qYaRnSR4/TeixH2TVJlI/AAAAAAAAA6U/gYrDmDItWJQ/way2blogging_searchbox6.png) no-repeat scroll center center transparent;width:307px;height:50px;disaply:block;}
form#w2b-searchform{display: block;padding: 12px;margin:0;}
form#w2b-searchform #s{padding: 6px 6px 6px 26px;margin:0;width: 215px;font-size:14px;vertical-align: top;border:none;background:transparent;}
form#w2b-searchform #sbutton{margin:0;padding:0;height:30px;width:30px;vertical-align: top;border:none;background:transparent;}
</style>   
<div id="w2b-searchbox">
<form id="w2b-searchform" action="/search" method="get">
    <input type="text" id="s" name="q" value=""/>
    <input type="image" src="https://img1.blogblog.com/img/blank.gif" id="sbutton" />
</form>
</div>
 Also know how to install it in WordPress 
These all gadets are cute and very simple. I recommend you to install a Blogger search box widget
Which suits in your template. If you are facing any issue, Plz let me know in the comment section.
Have a nyc day..!!!!!God bless.... 


Filed Under: Blogger gadgets, Blogger tips, Blogger widgets Tagged With: Stylish Colorful Search Box for Blogger

Add open graph protocols meta tags to blogger/website for good performance on social sites

July 1, 2013 By Sanjay Choubey 15 Comments

Many time we see that when we share a blog/website post url to facebook or other social site. The same title and description of that post doesn’t show. Its an error and these types of problem can be resolved by using open graph protocol meta tags.

What is open graph protocol meta  tags :

This tag combines all unstructured data into a structural format in social sites  it is very useful for SEO and SMO point of view. Some times you see that when you have added a widget in your blogger blog and some one likes your post he wants to share it but an error shows that sorry the page could not be reached. Generally wordpress gives plugins to overcome this error but in Blogger and website we need to add some meta  tags so that your page can be well  integrated on the graph of social sites like facebook, twitter, Linkedin, Google+.

Also read : How to show related posts below every Blogger post 

Benefits of adding meta tags:
  • Important meta tags for smo
  • It will select the most appropriate data to share
  • It will share exact blogger post title on social sites like facebook, google+ and twitter.
  • Fixed facebook errors for showing wrong blog address title, tag and description.
How to add in Blogger:
  • Go to Blogger
  • Choose your blog and click on template
  • Click on edit html
  • Find the code  like <html…..
  • Now paste the followining code just after <html

<b:if cond=’data:blog.pageType == &quot;index&quot;’>
<meta expr:content=’data:blog.pageTitle’ property=’og:title’/>
<meta content=’blog’ property=’og:type’/>
<b:else/>
<meta expr:content=’data:blog.pageName’ property=’og:title’/>
<meta content=’article’ property=’og:type’/>
</b:if>
<meta expr:content=’data:blog.canonicalUrl’ property=’og:url’/>
<meta expr:content=’data:blog.title’ property=’og:site_name’/>
<b:if cond=’data:blog.postImageThumbnailUrl’>
<meta expr:content=’data:blog.postImageThumbnailUrl’ property=’og:image’/>
<b:else/>
<meta content=’http://www.your-blog-logo.jpg’ property=’og:image’/>
</b:if>
<b:if cond=’data:blog.metaDescription != &quot;&quot;’>
<meta expr:content=’data:blog.metaDescription’ name=’og:description’/>
</b:if>
<meta content=’APPS-ID’ property=’fb:app_id’/>
<meta content=’FACEBOOK-PRIFILE-ID’ property=’fb:admins’/>
Click on save..All done..!!!!!!!!!!!!!!!!
If you own a website and wanna add this tag. Then simply add the below tag in between <head> and </head>
 

<meta property=”og:title” content=”YOUR-WEB-PAGE-TITLE” />
<meta property=”og:type” content=”article” />
<meta property=”og:url” content=”YOUR-WEB-PAGE-URL” />
<meta property=”og:image” content=”YOUR-WEB-PAGE-IMAGE-URL” />
<meta property=”og:site_name” content=”YOUR-SITE-NAME” />
<meta property=”og:description” content=”YOUR-WEB-PAGE-DESCRIPTION” />

Now save it..All done…

Filed Under: Blogger tips, SEO

  • « Previous Page
  • 1
  • …
  • 28
  • 29
  • 30
  • 31
  • 32
  • …
  • 36
  • Next Page »

Locations I Serve

Delhi | Noida | Gurugram | Ghaziabad | Faridabad | Chennai | Patna | Mumbai | Bangalore | Hyderabad | Kolkata | Pune | Jaipur | Lucknow | Chandigarh | Bhopal | Indore | Nagpur | Ahmedabad | Vadodara | Rajkot | Coimbatore | Kochi | Trivandrum | Ranchi | Bhubaneswar | Guwahati | Vishakhapatnam | Vijayawada | Mysore | Mangalore | Ludhiana | Amritsar | Jalandhar | Dehradun | Meerut | Kanpur | Varanasi | Prayagraj | Agra | Gwalior | Jabalpur | Raipur | Bilaspur | Durg-Bhilai | Jamshedpur | Dhanbad | Siliguri | Shimla | Srinagar | Jammu | Goa | Rishikesh | Greater Noida | Surat

Copyright @ Sanjay Choubey
WhatsApp Call Now